VirtualBox is a free, open source virtualization platform that you can run on Linux, Windows, or macOS (among others). Because it is extremely accessible and pretty easy to learn, I usually recommend it to first time creators of virtual machines. In this post I show how to install VirtualBox, and configure VirtualBox to use a NAT Network and allow SSH from the host computer.
See the following video for a step-by-step procedure about installing VirtualBox in Windows and in Linux.
Duration: 8:54
Links
Creating a NAT Network in VirtualBox
By default, VirtualBox VMs are set to "NAT" mode. However, if you want to have multiple VMs that can communicate with each other, you will need "NAT Network" mode.
You can create a NAT network in VirtualBox from the graphical user interface (GUI), as shown in the following video, or from the command line interface (CLI). Both are described as written step-by-step procedures after the video.
Duration: 8:15
Option 1: (GUI)
Version 7 Process
-
Go to File > Tools > Network Manager
-
Click the Nat Networks tab.
-
If there is no NAT network, then right-click to create a new NAT Network here. You can use the default 10.0.2.0/24 IP network if you wish, and the task is complete. (You will need to configure the client VM's network setting to use this new NAT network.)
Old Way prior to Version 7.
-
Go to File > Preferences > Network.
-
Click the + sign to the right. A new NAT Network will be created. You can use the default 10.0.2.0/24 IP network if you wish, and the task is complete. If you wish to use a different IP network, then continue to the following optional steps.
-
Double-click the new NAT Network.
-
In the Network CIDR field, change the IP scheme to whatever you wish. For example, to use something different than 10.0.2.0, enter in 192.168.15.0/24.
-
Press OK for all open windows.
Afterward, in the VirtualBox VM settings, go to Network, then in the "Attached to:" drop down menu select the NAT network that you just created.
Option 2: (CLI)
In Windows you need to navigate to the following path and run the command below.
C:\Program Files\Oracle\Virtualbox
Note: If you have issues using Powershell, use the Command Prompt instead.
In Mac and Linux you can run the command from any directory:
VBoxManage natnetwork add --netname natnet1 --network "192.168.15.0/24" --enable --dhcp on
Adjust the name of the NAT Network and the IP scheme as you see fit. The name of the NAT Network in the example is “natnet1” and the IP scheme is 192.168.15.0/24
Afterward, in the VirtualBox VM settings, go to Network, then in the "Attached to:" drop down menu select the NAT network that you just created.
How to setup SSH capability into a VirtualBox guest on a NAT Network.
Guests on a VirtualBox NAT network can access external systems and the Internet. However, by default, the host computer cannot access the guests. At times, you might want to connect from your host computer to a VirtualBox guest with SSH in the command line. To allow this, add a port forwarding rule in VirtualBox by following the steps below.
-
Go to File > Preferences > Network, and then double-click the appropriate NAT Network.
-
In the NAT Network window click Port Forwarding.
-
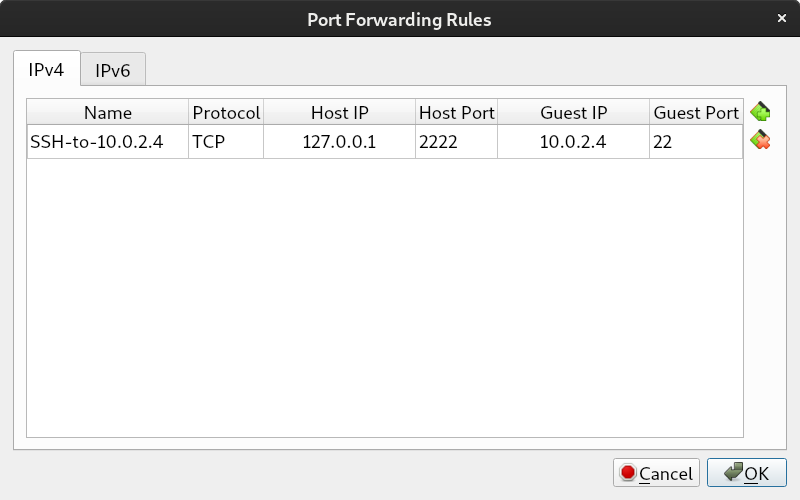
Click the + sign to add a new rule, and add the appropriate information, similar to the figure below. The Guest IP address will vary depending on your VM’s IP and your particular NAT Network setup. For example, it could be a different IP address on the 10.0.2.0 network, or on a different NAT network altogether if you created a separate one.
-
Connect to the guest with SSH using a command similar to the following:
ssh -p 2222 user@127.0.0.1
Note: The port number portion (-p 2222) can go before or after 'user@127.0.01'. Be ready to supply the password of the user account on the guest computer.
The connection on the IP address 127.0.0.1 and port 2222 will redirect to the IP address of the guest (in this case, 10.0.2.4) and port 22. That should begin an SSH session.
For every other VM that you want to connect to, simply create a new rule and increase the port number by one. For example, 2223, 2224, and so on.


